

What is Asanas?
An asana is a body posture, originally and still a general term for a sitting meditation pose, and later extended in hatha yoga and modern yoga as exercise, to any type of pose or position, adding reclining, standing, inverted, twisting, and balancing poses.
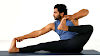
1. Aakarna Dhanurasan

This asana is to be performed in sitting position. In this asana the shape of the body becomes like the shape of drawing (pulling) the bow Hence it is called Aakarna Dhanurasan.
Original Position
Keep both the legs straight.
Put knees touching the ground.
Keep heels and toes of both the feet joined.
Keep hands straight from elbows and put on the sides of both the legs.
Keep palms (of the hands) on the ground.
Keep fingers of hand joined with one another.
Keep upper part of the body from waist straight and loose.
Method
Hold toes of both the feet with index fingers (first fingers) and thumbs of both the hands.
Pull the same leg with any one hand. Pull the toe of the foot till it reaches near the ear.
There is another method of doing this Asana keep both the legs straight and hold them with tangled hands. Then pull the leg held by hand below up-to the ears.
Stay for about a minute in this position. Then come in the original position in reverse order.
In the same way hold this asana for the same time duration on the other side.
Points to bear in mind
Bring the leg held by hand slowly up-to ear, don't make haste.
The stomach would be contracted and bent a little.
Benefits
Muscles of the whole body get good pulling with this asana.
Flexibility of the body increases.
It is useful in lessening fatigue of the body.
2. Ushtrasana

This asana is to be done in sitting position. Ushra means camel. In complete state of this asana the shape of the body resembles to the shape of the camel to some extent. Hence it is called ushtrasana.
Original Position
Keep both the legs straight.
Put knees touching the ground.
Keep heels and toes of both the legs joined.
Keep hands straight from elbows and put on the sides of both the legs.
Put palms (of the hands) on the ground.
Keep fingers of the hand joined with one another.
Keep upper part of the body from waist straight and loose.
Method
At first hold Vajrasan.
Keep the distance of about one foot between both the knees, keep distance of about four inches between toes of both the legs.
Stretch both the hands from behind, hold the ankles of both the legs firmly.
Stretch thigh, stomach and chest forward and bend the head backside. The body from the knee to the head would remain bent like a spring.
Remain in this position according to one's strength. Then come in the original position in reverse order.
Points to bear in mind
Draw out the stomach and the chest as far as possible. Bend the head backside as much as possible, so that enough bending of the body, is done.
Continue breathing with normal speed.
Don't stay in this asana for long time. Repeat this for three to five times.
Benefits
Spine remains flexible, healthy and efficient.
Constipation and indigestion get removed.
Respiration - efficiency increases. The liver, spleen and pancreas remain healthy and efficient
Unessential fat of the body gets removed.
3. Lolasana

This asana is to be done in sitting position. When the body comes in the complete position of this asana, it can swing like a pendulum of the clock. Hence it is called "Lolasana". In this asana, it is required to lift the body with the help of hand in Padmasana position. Hence it is also called outhit Padmasana.
Original Position
First of all, sit extending both the legs straight.
Put your hands on the sides of thighs.
Make the spine a little straight.
Method
First of all, sit in Padmasan. Keep both the hands outside the thighs. Arrange such that the palms lie on the ground and fingers in the opposite direction.
Keep the body as high up as possible with the strength of hands. Be in this position for some time.
Bring down the body slowly and come in the original position.
Points to bear in mind
In the complete position of asana, keep the neck and sight straight.
Benefits
Organs like arms, chest etc. develop completely. Muscles of the arms become strong.
You get rid of idleness and negligence. Organs of the respiratory system are nourished and become more active.
4. Garbhasana

This asana is to be done in sitting position. The form of this asana is just like a child in the embryo. Hence, it is called Garbhasana.
Original Position
First of all, sit extending the legs straight.
Put hands on the side of the thigh.
Make the spine straight (erect) a little.
Method
At first hold padmasaria.
Draw out the right hand from the right calf (of leg) and thigh and the left hand from the left calf and thigh up to the elbows.
First of all, do Poorak. Then while doing Rechak hold the right ear - lobe with the right hand and left ear - lobe with the left hand.
In this position be in normal breathing according to capacity.
While doing Poorak, come again in the original position.
Points to bear in mind
While doing this asana, take care that you do not tumble down.
Benefits
Semen is saved and the mind becomes steady.
Many disorders of the intestines get rid of
Fat on the thighs gets removed and the thighs become shapely.
5. Pavanmuktasana

This asana is to be performed in supine position (lying on back). Pavan means gas and mukta means released. This name of the asana shows that this asana removes unnecessary gas from the stomach and the intestine.
Original Position
While lying on the back, keep both the hands near knees / near thigh.
Keep legs near to each other and palms touched each other and straight from the knees.
Keep palms open to sky.
Method
Bend legs from knees. Keep both the heels near the hips and knees in the direction of the sky.
While doing reehak, bring knees near the chest and press with the help of hands.
Raise the trunk (of the body) and the head and establish them in between the chin and knees. Perform bahya kumbhak after doing Rechak.
Heels should be in touch with the hips and pressure on the stomach is to be applied with the thighs.
In order to attain complete benefit of this assn. do Rechak completely and try to remain in the bahyakumbhak as long as possible.
Come again in the original position slowly.
Points to bear in mind
It is essential to pay attention to Rechak in this asana. Do complete Rechak and Bahya (external) kumbhak also.
Don't do this asana while suffering from hernia, severe waist pain, and any injury to stomach.
Benefits
Constipation (of bowels) and gas get removed.
Disorders of digestive organs are removed and their capacity increases.
One gets rid of knees pain and ankle pain.
Waist ache and back - ache are removed.
Fat on the stomach decreases.
6. Setukasana

This asana is to be done lying on the back. In this asana the shape of the body becomes just like setu - bridge. Hence it is called Setukasana or Setubandhasana.
Original position
Keep both the hands near the knees lying on the back.
Keep legs near to each other, and palms touching each other and straight from knees.
Keep palms open to sky.
Method
Keep support with both the hands below waist. Upper - arms in between shoulder and elbow parallel to ground. Keep hands from elbow to wrist straight at right angle.
Keep support of hands below waist. Raise slowly back, waist, hip and both the legs from the ground. Don't bend knees, keep heels and palms on the ground, keep legs close to each other.
Thus, the shape of the whole body becomes like setu (bridge). This is the last position of this asana.
Points to bear in mind
- Beware while holding the waist with the help of palms of both the hands. Part of head and neck touch the ground.
Benefits
Practice of this asana gives exercise to the bones of following: Joints of bones of shoulders, joints of bones of elbows, and of wrist, fingers, the whole spine, bones of hip of the waist, bones of knees and ankles.
This asana is beneficial to patients of Osteoporosis.
7. Naukasana

This asana is to be done lying on the back. In this asana the form of the body becomes like a boat (Nauka). Hence this asana is called naukasana.
Original Position
Lie down on back on a carpet (asana).
Keep hands aside.
Keep legs close to each other.
Release the body loose.
Method
Raise both the legs high, so that angle between ground and legs becomes 450. Keep both the legs together. Take care that legs do not bend from knees.
In the same way raise the upper part of the body i.e. back, head and hands all together. Raise this part also high at an angle of 45°. Keep both the hands in the direction of legs. Keep your sight towards big toes of both the legs.
The whole body would be balanced by the support of the hips. This is the complete state of Naukasana.
Be in this position for some time. Then come to the original position in the reverse order.
Points to bear in mind
Don't give jerks while raising up the part of the body.
Take care that the body may not tremble while holding this asana.
In the beginning perform this asana for few seconds only. By increasing practice, it can be reached up to two minutes.
After maturity in practice hands, legs, back and head can be raised simultaneously.
Benefits
It keeps muscles and organs of the stomach healthy.
It increases balance - capacity of the body.
It decreases fat on stomach and hips.
It gives firmness and steadiness to the body.
It keeps the spine healthy and capable.
8. Chakrasana

This asana is to be done lying on the back. In this asana the form of the body is just like a chakra (wheel of disc), Hence it is called chakrasana.
Original position
Keep both the hands near the knees lying on the back.
Keep legs near to each other and straight from knees.
Keep palms towards ground.
Method
At first while doing Poorak, keep feet touching the ground so that both the legs bend from knees in standing position.
Keep both the hands-on back side of the head and palms towards ground.
Keep palms and legs firmly gripped with the ground and raise the body slowly from the waist.
Keep the head touching the ground.
Slowly raise the head also high up from the ground and keep your sight on backside. Stay in Kumbhak according to capacity.
While performing Rechak come again in the original position slowly in the reverse order.
Points to bear in mind
In this asana at the time of raising the body from the waist take care that hands and legs may not slip. Bring the waist downward slowly, take care not to collide.
Benefits
The spine gets good exercise.
Indigestion or constipation gets removed.
Feeling of zeal and enthusiasm prevails in the body.
The posture becomes proper.
9. Bhujangasan

This asana is to be done lying on the stomach. Bh-ujang means serpent. In this asana, the shape of the body becomes like the shape of the serpent raising its hood. Hence it is called Bhujangasana.
Original position
Lie on stomach, both the hands on the side of thighs.
Keep palms touching the ground.
Keep palms close to each other.
Keep chin leant on ground.
Keep whole body straight.
Method
Keep palms near respective shoulders on the side of chest.
Keep palms and elbows touching the ground.
Raise the head, shoulders and chest from the ground to the navel while doing Poorak. This is a complete position. Stay in this position for some time.
Again, put the head and the trunk on the ground while doing Rechak.
Come in the initial position.
Points to bear in mind
Students suffering from diseases like hernia, ulcers of stomach, hypo thyroidism, severe back ache, internal T. B. should not do this asana.
Women should not do this asana during menstruation period.
The patient with post operation of stomach should not do this for 2 - 3 months.
Benefits
Organs of the stomach get massaging and remain healthy.
Muscles of the neck become strong.
Troubles of urination get rid-of, and the waist becomes more flexible.
It gives relief in troubles like stomach - ache, sciatica aching, vertebra - slip etc.
Women get relief in pain during menstruation period and irregularity of menstruation is removed.
10. Shalabhasan

This asana is to be done lying on the stomach. Shalabh means locust. In this asana the shape of the body becomes like shalabha, hence it is called shalabhasana.
Original position
Lie on the stomach.
Keep both the hands on the sides of thighs.
Keep palms touching the ground.
Put legs close to each other.
Keep chin leant on the ground.
Keep whole body straight.
Method
Do Poorak for long. Raise up both the legs simultaneously straight from the ground. For that, press your patens on the ground, and make use of hands as lever. This is the complete position of asana.
Stay in internal kumbhak according to capacity. Then bring down legs while doing Rechak.
Come in initial position.
Points to bear in mind
Bring your legs very slowly, while lifting both legs high and again keeping them down, see that there is no collision even a little.
Don't do this asana, if suffering from hernia, ulcers, high blood pressure, internal TB or any problem of heart, and severe waist ache.
Benefits
Troubles of stomach, constipation and gas are removed.
Liver, pancreas, kidney and Pituitary glands become strong.
Additional fat is removed and waist becomes thin and shapely.
The spine becomes strong and its nerves become efficient.
Piles are removed.
11. Garudasan

This asana is to be done in standing position. In this asana the shape of the body becomes like Garuda (eagle), hence it is called Garudasana.
Original position
Keep both the legs together.
Keep both the hands straight, close to the body, sight straight - in front.
Keep fingers of hands touching the body.
Method
Let the right leg be on the ground as it is.
Hold the left leg high, and wrap the right leg on the front side. Left leg would be wrapped and close to right leg.
Raise both hands high in front and entrap both hands with each other in a knot. In this position keep both hands in front of the mouth.
This is the complete state of garudasana. Stay in this state as per capacity.
Come in the initial position in the reverse order.
Practice this asana on the other leg for the same time period.
Points to bear in mind
Arrange hands and legs like this. That hand concerning the leg steady in the ground, may be arranged higher than the other hand, and then tangle the hand. When you perform this asana on the second leg arrangement of the hands would change.
Take care not to fall.
Benefits
Legs and hands become strong.
Balance capacity of the body increases.
Practice of this asana in adolescence stage helps in increasing height.
Concentration increases. It helps in Dharana.
It helps in restraining the mind.
12. Makarasana

This asana is to be done in the position lying on the stomach "Makar" means "Magar" (Crocodile). When this asana is in the complete state, the body seems like a in Magar (crocodile).
Original position
Lie on stomach.
Keep both the hands-on sides of thighs.
Keep palms touching the ground.
Keep the legs touching each other.
Keep chin leant on ground, the body completely in erect position.
Method
Keep a distance of a foot between both the legs. Keep heels inside, fingers and tots outside.
Keep both the hands one above the other below forehead.
Relax the body completely stress free, and lie down in the relaxed position.
Points to bear in mind
Make respiration process very normal and natural.
Make the complete body loose and relax.
Make the mind quiet.
The person suffering from low B. P. and problem pertaining to heart should not do this asana.
Benefits
Physical fatigue is removed.
Intestines become active, due to which gas and constipation are removed.
Fat decreases.
It is beneficial to the patient of high B. P.
Mental stress and sleeplessness are removed.
Read also: -


0 Comments
if you have any doubts, Please let me know